Saturday, June 8, 2013

Currently

Hello crafty readers! So I have had several projects going lately. On top of my son's first year Project Life book, my 2013 Project Life book, I have been working on a church bag for my son which I just finished today. I also have been doing a Heidi Swapp Memory Files Album which has just been a book about me, and important people and memories. I also have been doing a little bit of Smash*ing again, after being inspired by joining a group on Facebook. I love Smash*ing because it's just whatever I want. I feel a little more confined by Project Life that it has to be memories etc, but Smash*ing is whatever I feel like doing! Anyhow, I have been a little demotivated lately with Project Life too. I took a break with my son's book because I was just feeling bored with it. Now I am feeling the same way with my 2013 book. So I think I will work on other things right now, and come back to PL later.
Anyhow here is some looks at what I have been doing. I'm sorry I don't share my Project Life. Right now I am still on the fence about sharing. I just want to try to protect my son as much as I can. I might eventually share, but for now I have decided to hold off.
So first off here is the bag I made. This was done on my Silhouette Cameo. I ironed on Heat n Bond Lite on the back first. Then I ran it through my cameo with the blade at 5, and speed on 1. Cut pretty much perfectly. Then I adhered it to the bag. Then I sewed around the letters. So here is what I learned from this experience. First off, be careful with rotary cutters because I almost cut the top of my pinky off. Not fun! Next would be you have to PLAN on sewing around the letters. The heat and bond is not permanent. At least it wasn't in this combination. It stayed on long enough for me to sew it down. Lastly would be, if you stink at sewing like me, accept that fact. LOL. It looks horrible up close. But looks great from this far out. LOL So, it works for me! I think it turned out super cute and I'm glad I tried it! I have one more tote bag, I'm debating on whether to make another bag for my son for when he goes to get babysat at the grandparents or make one for my nephew who is 3 months younger then DS. We will see but I will be sure to share whatever I do!

This is before I sewed it, but I used a little black button for the elephants eye and sewed it on by hand.


Here is fun card I made for a swap. I used inspiration from somebody on a board, and I'm sorry I can't find it anymore! The group I got it off of closed. So if you know I used this idea from your blog please tell me and I will link! It turned out super cute though! Love all the owls. The only thing I really don't like is the You're a Hoot got all jacked up. But thanks to my friend Karen, whose blog you can find in my blog list, I think I will get better results from now on! The card base is a cut from Lori Whitlock on the SIL store.

Here is a cute baby card I made for the same swap. The circle in the middle spins. I put this stamp and then you spin it around and it says WHOA BABY! on the other side. Very cute. The stamps are from Avery Elle, the card is another Lori Whitlock from SIL store. You will be seeing a lot of her stuff on here, because she is totally my style!


And last but not least, the last card for the swap. Another Lori Whitlock card, and the cloud is a Die from The Greeting Farm. So is the sentiment.
So those were my recent projects. I hope to share more often. Hopefully one of these days I will photograph me working on something from start to finish! I just keep forgetting. Hope you enjoy! :)


post signature

Wednesday, May 29, 2013

Well....

As you can see, I am the most awesome blogger on the planet! LOL NOT! So, here is my list of excuses. We were all sick pretty much the whole month of April. I am not even joking. It started off with my Son having a 103 fever for 6.5 days. Yeah. It was Roseola, but it is one of those things that is scary, until the fever breaks and then the rash hits. THEN, DH and I got colds right after. It was one of the WORST colds I have EVER had. So April was awful. May has been alright, but I was feeling extremely demotivated because my tiny little nook was just NOT working for my creating. So I stopped doing much crafts. But tonight! We moved all my stuff in to another room, so I'm all spread out and have plenty of room to work! So, be on the look out for awesomeness ahead! OH! And also a huge announcement, I sold my Cricut stuff and got a Cameo, and I am in LOVE! I was on the fence about it for a long time. Started having issues with Cricut and just decided you know what? I want the Cameo. And it just so happened that HSN was having another flex pay deal right around that time! So I SCORED, and I haven't regretted it one bit. So there will be LOTS of Cameo things done. What I am working on now. Well, I am working on this years Project Life...I have the title page done. LOL. Yep. I took a break from my Son's first year book because I was just getting bored. So I'm going to hold off on that for now, and try to push through and get a lot of this year's book down. I am also working on various swaps, and I am doing a Heidi Swapp Memory Files album! So I will start sharing my work on that with you too! I am planning on ordering 4 more. I have 2 more coming to me, and then I am going to order 2 more. I am planning to make 3 of my nieces a book. Just with various pictures and memories. :) But the one I am working on right now is kind of my own thing, plus Heidi Swapp is doing a guided book on her blog, so I am also adding something from that! 
Anyway! This blog will get better from here out! :) See ya soon!
post signature

Wednesday, April 10, 2013

WARNING: disaster ahead!!!

So, I am not a blogger that will be only showing things that will turn out. My crafting life is full of disasters...most of the time I learn from them. Some disasters have made me realize that some crafts just aren't for me (cross-stitching and knitting!) and have led me to look for other avenues for my creativity.
As you saw for my first blog I started sewing in paper, and surprise the straight stitch turned out awesome!!! I really want to be able to zig zag on paper too. So I got my sewing machine out again, and tried it in my test paper. Well I don't know what I am doing wrong (and still apparently am) but my zig zag stitches were coming up upside down. Still haven't figured that out....so I just figured I would just sew on the wrong side and that worked fine. First time through was going great....and then my bobbin ran out of thread! So I had all these giant holes. Oh well. Picked them out and figured I would still push forward.
Got all the way around the card, and right on the most viewable corner ended up with a birds nest! Gahhhhh!!! So I think well, now it will just be shabby chic! Added the finishing touches and voila!!!


You might not think it looks too bad, and I didn't think so either.....until....


Yep I sewed it together!!! Bahahahahahahaha!!!


So yeah. This didn't pan out. Lol I still don't know what I am doing wrong with the zig zag stitch, but I will keep trying!!!! Lol

Thursday, April 4, 2013

{SOME} of my favorite crafty tools!

Hello all! Tonight I thought I would just share of my favorite things that I use all the time!! I am going to try to post at least every other day, sometimes maybe more, but I will for sure have a craft to share next! 

1st off is Tim Holtz Distress Ink! LOVE it!!! So many things you can do with it, so many beautiful colors! Highly recommend trying these out! There are lots of YouTube videos to show you exactly how to use them. They are AWESOME! I store them upside down so they are nice a juicy when I reach for them. I also have no organization for my blender pads, because I have tried everything. So I finally just marked my browns with the initials for the color, and that's it. Not too hard to tell the rest of them.
2nd is my OttLite! Awesome light! They are a bit pricey, so watch for sales. They offer a beautiful white light that make colors appear more vibrant, and it doesn't make my eyes do weird things like yellow light does for some reason. This one can be ran off batteries, or a plug, but it doesn't come with a plug which stinks, because the batteries really don't last too long. But we found a plug sitting around that worked. But I highly recommend getting a plug for it.
3 has 3 items in it! First off is my Hero Arts Scrubber Pad. Ummmm wish I had bought one when I first started stamping. I was cleaning mine with baby wipes, and I don't know if anyone else has this problem, but the clear stamps have this stickiness to them. And it was making little hairs and pieces of the wipes stick to it! This one comes with a top pad and a bottom pad, you spray the bottom one, which is what I use my little Ranger Mini Mister for, clean off the stamp by rubbing it across the bottom pad and dry it on the top. That is really all I use my mini mister for, I am not a huge fan of the water look with the distress inks. But defiently having a little bit of water around is always a good thing when crafting! And lastly in this pic my Memento Tuxedo Black ink. Perfect stamps every time...love this ink pad. I will always have one of these!
Xyron sticker maker! This is the Teresa Collins version which is OH so cute. I actually currently have two of these, one has re-positional stuff in it. If you don't have one of these and you DO have my next item you seriously need to get one!
My Cricut Expressions 2! Now, before you all start telling me how much they stink compared to the Cameo, I will say this. I would LOVE a Cameo. But I refuse to sell my Cricut. I love it too. So until the day I can reasonably afford both machines and have the space for both, I will be sticking with my Cricut. That said, you will love having a Xyron sticker maker if you have a Cricut. You send the little tiny pieces through...eyes, mouth, little embellishments. Cleaner image because you don't have to hassle with glue! Love my E2 though. I started out with a Create, and loved it, but love the bigger size!
Cuttlebug! I started out with the Sizzix Boutique...which is a great beginner machine. But then my MIL gifted me some embossing folders and one of them was a 5X7. I was still kind of on the fence about moving up to the cuttlebug but then I saw it at Joann's for 40 percent off! So I snatched it up! And I love it! Small footprint, folds up nicely, and does so much! Highly recommend it!
My Fiskars paper cutter. LOVE! So I have a Provo Craft cutter, which is great. But no where around me carried the replacement blades and it was really needing a new one. Plus I wasn't crazy about the lifting the bar to get the paper under thing. What did I do? I bought a cutterpede and oh that thing was evil. I know some people like them, but I gave it away because I just couldn't stand how it worked. I knew I wanted to find a swivel one. So I found these on sale at Michael's and decided on this one. And it works GREAT. It's easy to cut with, the only thing I really don't like about it is it's notched on one end for the blade to pop out and be replaced. And I store it standing up, so it falls out if I don't make sure to put the other side down. But other then that I love it! :)

So these are just some of the things I regularly use. I will for sure be sharing a craft in the next couple of days. Got a couple ideas going, so check back soon!

post signature


Tuesday, April 2, 2013

Hello! SEW happy you came by!

Hello blogging world! Some of you have followed me on my infertility blog
but since my journey for now is on pause since having my son, I decided to start a new crafting blog! Just a few things about me and my crafting "history" if you can call it that, lol. I really started crafting back in Jr. High when my sister became a Creative Memories consultant. It was short lived, but introduced me to the world of scrapbooking. After that, I did little crafts here and there, but really started to get in to it in High School when my best friend was a scrapbooker too and we used to get together on breaks or after school and scrapbook together. It was AWESOME. It is always more fun scrapping with someone is my thought! 

I got away from scrapbooking during my 7 years of infertility. It was a hard....I still did somethings here and there, but didn't really have a true scrapbook. Once I got pregnant (finally!) I started dabbling in some knitting (epic FAIL), and started making somethings for the baby. Ever since then I have pretty much be crafting but in the last 2 months, I have REALLY jumped back in to it, and really love it! 

I was doing a little bit of smashing while my son was a newborn/baby, but when I started his actual scrapbook, I just could NOT get myself motivated. Traditional scrapbooking takes a LOT of commitment. And I just couldn't find it. Enter, Project Life! (beckyhiggins.com) I love Project Life! I like to make cards, and so it to me mixes the best of both worlds, scrapbooking and card making. I am not sure if I will share my PL (project life) book on here or not, because I'm not too excited to share pictures about my son, or our personal life on here. It's more about the crafts. But I may show some cards I create, since I am part of some swaps. :) 

Anyhow on to the crafting. Tonight I am showing my first attempt at sewing on paper. I have seen this trend and LOVE it! I don't have too many pictures, because these cards were really quite simplistic. But I think they turned out cute none the less. My sewing machine sewed like a champ! All though I would HIGHLY recommend using a test sheet of paper. I forgot that I had a bigger, heavier duty needle in there so it made big holes! 

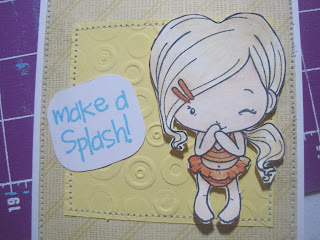
So here is my set up. I am currently using a Value Pack of note cards from the Paper Studio sold at Hobby Lobby. They aren't true A2 sized cards though, so I probably won't get them again. Then I have a yellow striped paper from the Sweet Matstack by DCWV. A scrap yellow sheet of paper ran through my cuttlebug, and I'm sorry I don't know the name of the folder it was sent through! I didn't keep any of that stuff. I guess I should get better at it. Then the Make a Splash, and little girl are from The Greeting Farm's Summer Fun set, and I colored her with Prismacolor colored pencils. Oh and the sentiment is stamped with Hero Arts Neon Ink in Blue. 

So I taped down both sheets with my Scotch ATG gun (which I am MEH about, I will do a review later). I first started stitching around the smaller yellow sheet first. And if you remember anything from home economics, when you go around corners leave you needle in the paper and lift up the foot. You will find if you read my blog, I can't cut straight, so I have pretty much accepted the fact that sewing straight is kind of like winning a million dollars for me. LOL, so please understand that. I am NOT a perfectionist, and personally I like how it looks sewn imperfectly. It looks more homemade and cute to me. I didn't change any settings on my sewing machine, and just did straight tight stitch. I will try zig zag next. Just wanted to leave it simple for this project. 

And here it is close up. I also sewed around the outside yellow card too. The girl is popped up a little on micro dots. I really like how it turned out! 

View of the whole card. Sorry for the horrible shot. I am going to have to borrow my Dad's little photo studio box. :) It turned out really cute though! 

Then I quickly threw this one together. The two flags are washi tape. Really like this look, and I will probably keep using it! :) 
Hope you enjoyed this first blog. Please keep coming back! I want it to be a fun place to connect with people, share how I do crafts, and review products that I like and don't! :)

post signature